One of the many things I'm doing to prepare for my Capstone program at Launch School is familiarizing myself with Go, the language we'll be using when studying data structures and algorithms. While knocking out Codewars problems is helpful, I find I get better accustomed to a language's ecosystem if I try to build something with it. I also wanted to learn a bit more about Git and how it works, so I set out to build my own version of the Git CLI in Go - a tool I'll affectionately refer to as Got.
If you're more interested in a deeper dive, I recommend Mary Rose Cook's article, Git from the inside out.
Keep in mind the following as you come to implementation portions of the article:
This article assumes basic programming proficiency - I'll explain some Go specifics along the way, but mostly focus on Git
I might forget to include the specific packages I've utilized for that snippet. I'll try my best to catch all of them, but if you get any errors, check Go's package documentation to see which one you need.
This is meant to be a very quick exploratory project - i.e. it has very little error handling and manual testing - not a good practice for a project you want to build to be stable / long-term
Ironically, since Part 1 takes an atomized per-function approach and it's something I've just been toying with, the code isn't currently on my GitHub (it will be by Part 2 though, when we dive a bit deeper)
By the end of this series, the goal will be to use Got as a replacement for basic Git commands - initializing a repository, tracking files, making commits, and pushing/pulling, along with interfacing with GitHub.
Here's the Go logo for thumbnail purposes! So far that's my one complaint with HEY World - @ HEY team please let me set a thumbnail picture without having to awkwardly insert it somewhere.
What is Git?
For my non-technical readers (hi, aunt Jerri 👋🏻), you might not have heard of Git. Git is a version control system (VCS) that allows developers to collaborate on projects. It does this by keeping a snapshot, or a "version", of the codebase that acts as a point of reference when comparing changes that developers might make to it. There's a lot that goes into this, but let's take a look at this process, albeit simplified:
My friend Carl and I are working on a project together, and decide to upload what we've already whipped up to a Git provider, in this case GitHub.
We've now got ourselves a remote repository - this solves some potential headaches by providing a home for our code that isn't dependent on a single developer's system.
Anyone who needs to work on this project can clone the remote repository to their computer, thus creating a local repository. Let's say I add a file to my local repository. I tell Git to track that file, then push my changes back to the remote repository.
Now that this file exists on the remote repository, Carl can pull any new or changed data to his local repository. He then makes some changes to the file I added, and pushes the updates to the remote repository.
And then this process repeats ad nauseum.
Keep in mind that this is a surface level interaction with Git and there's a lot more to it than what will be covered in this article.
Initializing a Repository
Git allows us to initialize a local repository using the git init command.
At an implementation level, this is fairly straightforward - make directories and some files. Let's take a look at the bare-bones tree structure for the parent directory we need to make:
.git
│   HEAD
│
└───refs
│   └───heads
│
└───objects
Note: If you inspect one of your existing repository's .git directory, you'll see I left some stuff out - that's because the files listed here are the bare minimum a Git repository needs.
We start with a HEAD file, which contains a reference to what can be thought of as the current branch. So for a fresh repository, we want to write to the HEAD file the following:
ref: refs/heads/main
We then create a sub-directory refs, with its own sub-directory heads. If you look at the HEAD file contents, you'll notice that it points to a file within this heads directory. This is because a head is more specific than just the current branch - in reality, a head references a commit object - and the heads directory can contain multiple heads, each pointing to different commit objects. The HEAD file, then, acts as an alias to a lowercase head, which then points to a commit.
Alright, now I know that your head might be spinning, but we'll take a closer look at commit objects soon, which will clear up this maze of references.
We also need to create an objects directory, which will, as it sounds, act as a home for the different types of objects that get created along the way.
Now that we know what we need to make, let's build an init method in Go:
This function has a string parameter - repo - the parent directory of the entire project. The "os.MkdirAll" function will create parent directories for us even if they don't exist yet, which is why we only need to use it twice - once for our objects directory and once for our heads directory.
Trees, Commits, and Blobs - Oh My!
Before we move forward with our implementation, we have to take a detour and look into how Git keeps track of a repository.
We'll start with blobs, as they're the most straight forward of the three object types. Blobs represent an ordinary file that exists within a repository. And that's it! Of course, blobs and the other object types go through a compression process for Git to be able to efficiently track our repository, but we'll touch on that in just a bit.
Tree objects represent the working tree at time of commit. That is, when we are getting ready to send files to the remote repository, a tree object will be made and act as the snapshot of the files we're currently tracking. It does this by listing out the blob objects that have been created and tracked.
Commit objects are where everything comes together. The commit object contains references to the tree object for the current commit and a reference to the parent commit, along with the author, timestamp and commit message. We already know that the tree object contains references to our tracked files, but what is the parent commit?
The parent commit is a reference to the object that the HEAD file aliases. While we won't be implementing branching within Got just yet, the head objects are utilized for that purpose. This way a repository can tell which branch the changes should be pushed to. I'll elaborate on this in greater detail when (at this point considering my Capstone schedule, if) we come to implementing branching.
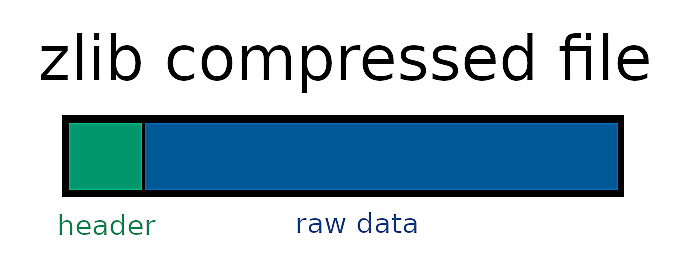
Finally, let's talk about the compression process we need to send our data through for Git to understand it. Each object consists of a header, which includes the object type and the objects size. The header is followed by a NUL byte before continuing with the raw data. All of this information is then zlib compressed before being written to a file.
To identify objects, we also need to send the full data through an SHA-1 hashing algorithm, creating a unique 40-character long string. Once all of this is done, we store the data within .git/objects/ab/cd..., where ab are the first two characters of the SHA-1 digest, and cd... being the remaining 38 characters.
While this might seem like an arduous process, Go's core library includes some very useful packages that we'll be utilizing to accomplish this.
Creating and Storing Objects
Now that we know the nitty gritty of how to create and store objects, let's implement this process in Go.
First, let's start with our zlib functions that we need to use in our object creation function:
These two functions, which handle both compression and decompression, are slightly tweaked from Go's documentation for the zlib package to be more useful to us in this situation.
Next let's create a function to hash and store our object:
This function takes the data being stored (e.g. the contents of a file for a blob object), the type of the object, and a boolean allowing us to control whether or not we want to create a new object file. We then return the SHA-1 digest - the 40-character string that uniquely identifies the object we've just created.
Next Steps
In Part 2, we'll piece all of this together by implementing git add and git commit - the commands that will utilize our object creation function. We'll also talk about the .git/index file, which is essential to tracking our changes.
See you (hopefully) next week! Enjoy the weekend and don't forget to go outside, it's good for you!