In this quick post I’m going to go over ways to get started with photogrammetry if you’re on a budget. I’m going to present in detail one open source solution that I personally believe so far as it all except that it can be a bit daunting to install. But contrary to all other tools it’s actually free.
The past year I've been working on improving my drone flying and photography skills and in general have been enjoying myself taking various videos and pictures of family on vacation as well as some nature shots. And I can only say that practice definitely makes you better 🤓.
But one of the applications of drones that I'm the most psyched about and consequently have watched the most Youtube videos about is photogrammetry, where you use the data the drone captures to create everything from 3D models to highly detailed maps and even more advanced data analyses like plant health and other things. But what have been holding me back for a while was the unavailability of tools where you could just get started without having to pay a fortune.
DroneDeploy - probably one of the most used solutions out there - costs 329$/month IF you pay annually 🤪. That's just insane. A few tools does it slightly cheaper, such as 3DF Zephyr which even have a free version where you're limited to 50 images in a 3D model for instance. If you're just starting out and just want to see what your new "toy" (that's not legally a toy) can do then these costs are quite prohibitive.
So in this post I'm going to look a bit at two options for 3D modelling, where one of them can also do more than that.
Luma Labs
This was the first software I found which is actually free and takes AFAIK a quite different approach to 3D modelling by the fact that it uses machine learning to create a machine learning model of the subject your photographing. All it takes is one orbit around the subject, create an account, hit upload and boom. you got yourself a nice 3D model. Sure is easy and fast to use. And it’s some what fast to generate too, 30-60mins or so..
And as long as you don’t zoom in these looks ok. Certainly I like how it captures the colors of the scene. But if you zoom in 🥴. I tried various ways to enhance the quality like using higher res video but didn’t help at all. So this was unfortunately, when I started to look elsewhere.
WebODM
I had almost given up and was considering to try 3DF Zephyr or Pix4D, when I found WebODM. WebODM is open source, so not only is it free but you can even check and try to understand how it works as well as extend it if you want to. This is also great because you can literally build your own little private DroneDeploy and scale the costs if you want to. They offer to ways to install: Using github and one using an installer which you pay for (starts at $57 so still a lot cheaper, considering that this is a one-time fee and not a monthly recurring). The installer is obviously the easiest solution but if you’re looking to either just try it out or want to use it for free then installing it via github is the option to go for. Down below I’m going to go over how to do it on a mac if you’re looking to try it out (and not familiar with the terminal). It really is very simple even if you cringe at the word “terminal” and “command line”.
So what does it do? Well that’s the cool thing, it quite literally does most of the things that DroneDeploy and similar software does. It does Orthomosaics, elevation models, 3D models, even plant health from NDVI, VARI or whatever kind of sensors you have, you can analyze multispectral data and yeah, just about anything you would expect from a fully fledged Drone Deploy suite. See here for the full list of features. So far I’ve only played around with Orthomosaics, 3D models and plant health (with VARI) and is really impressed so far.
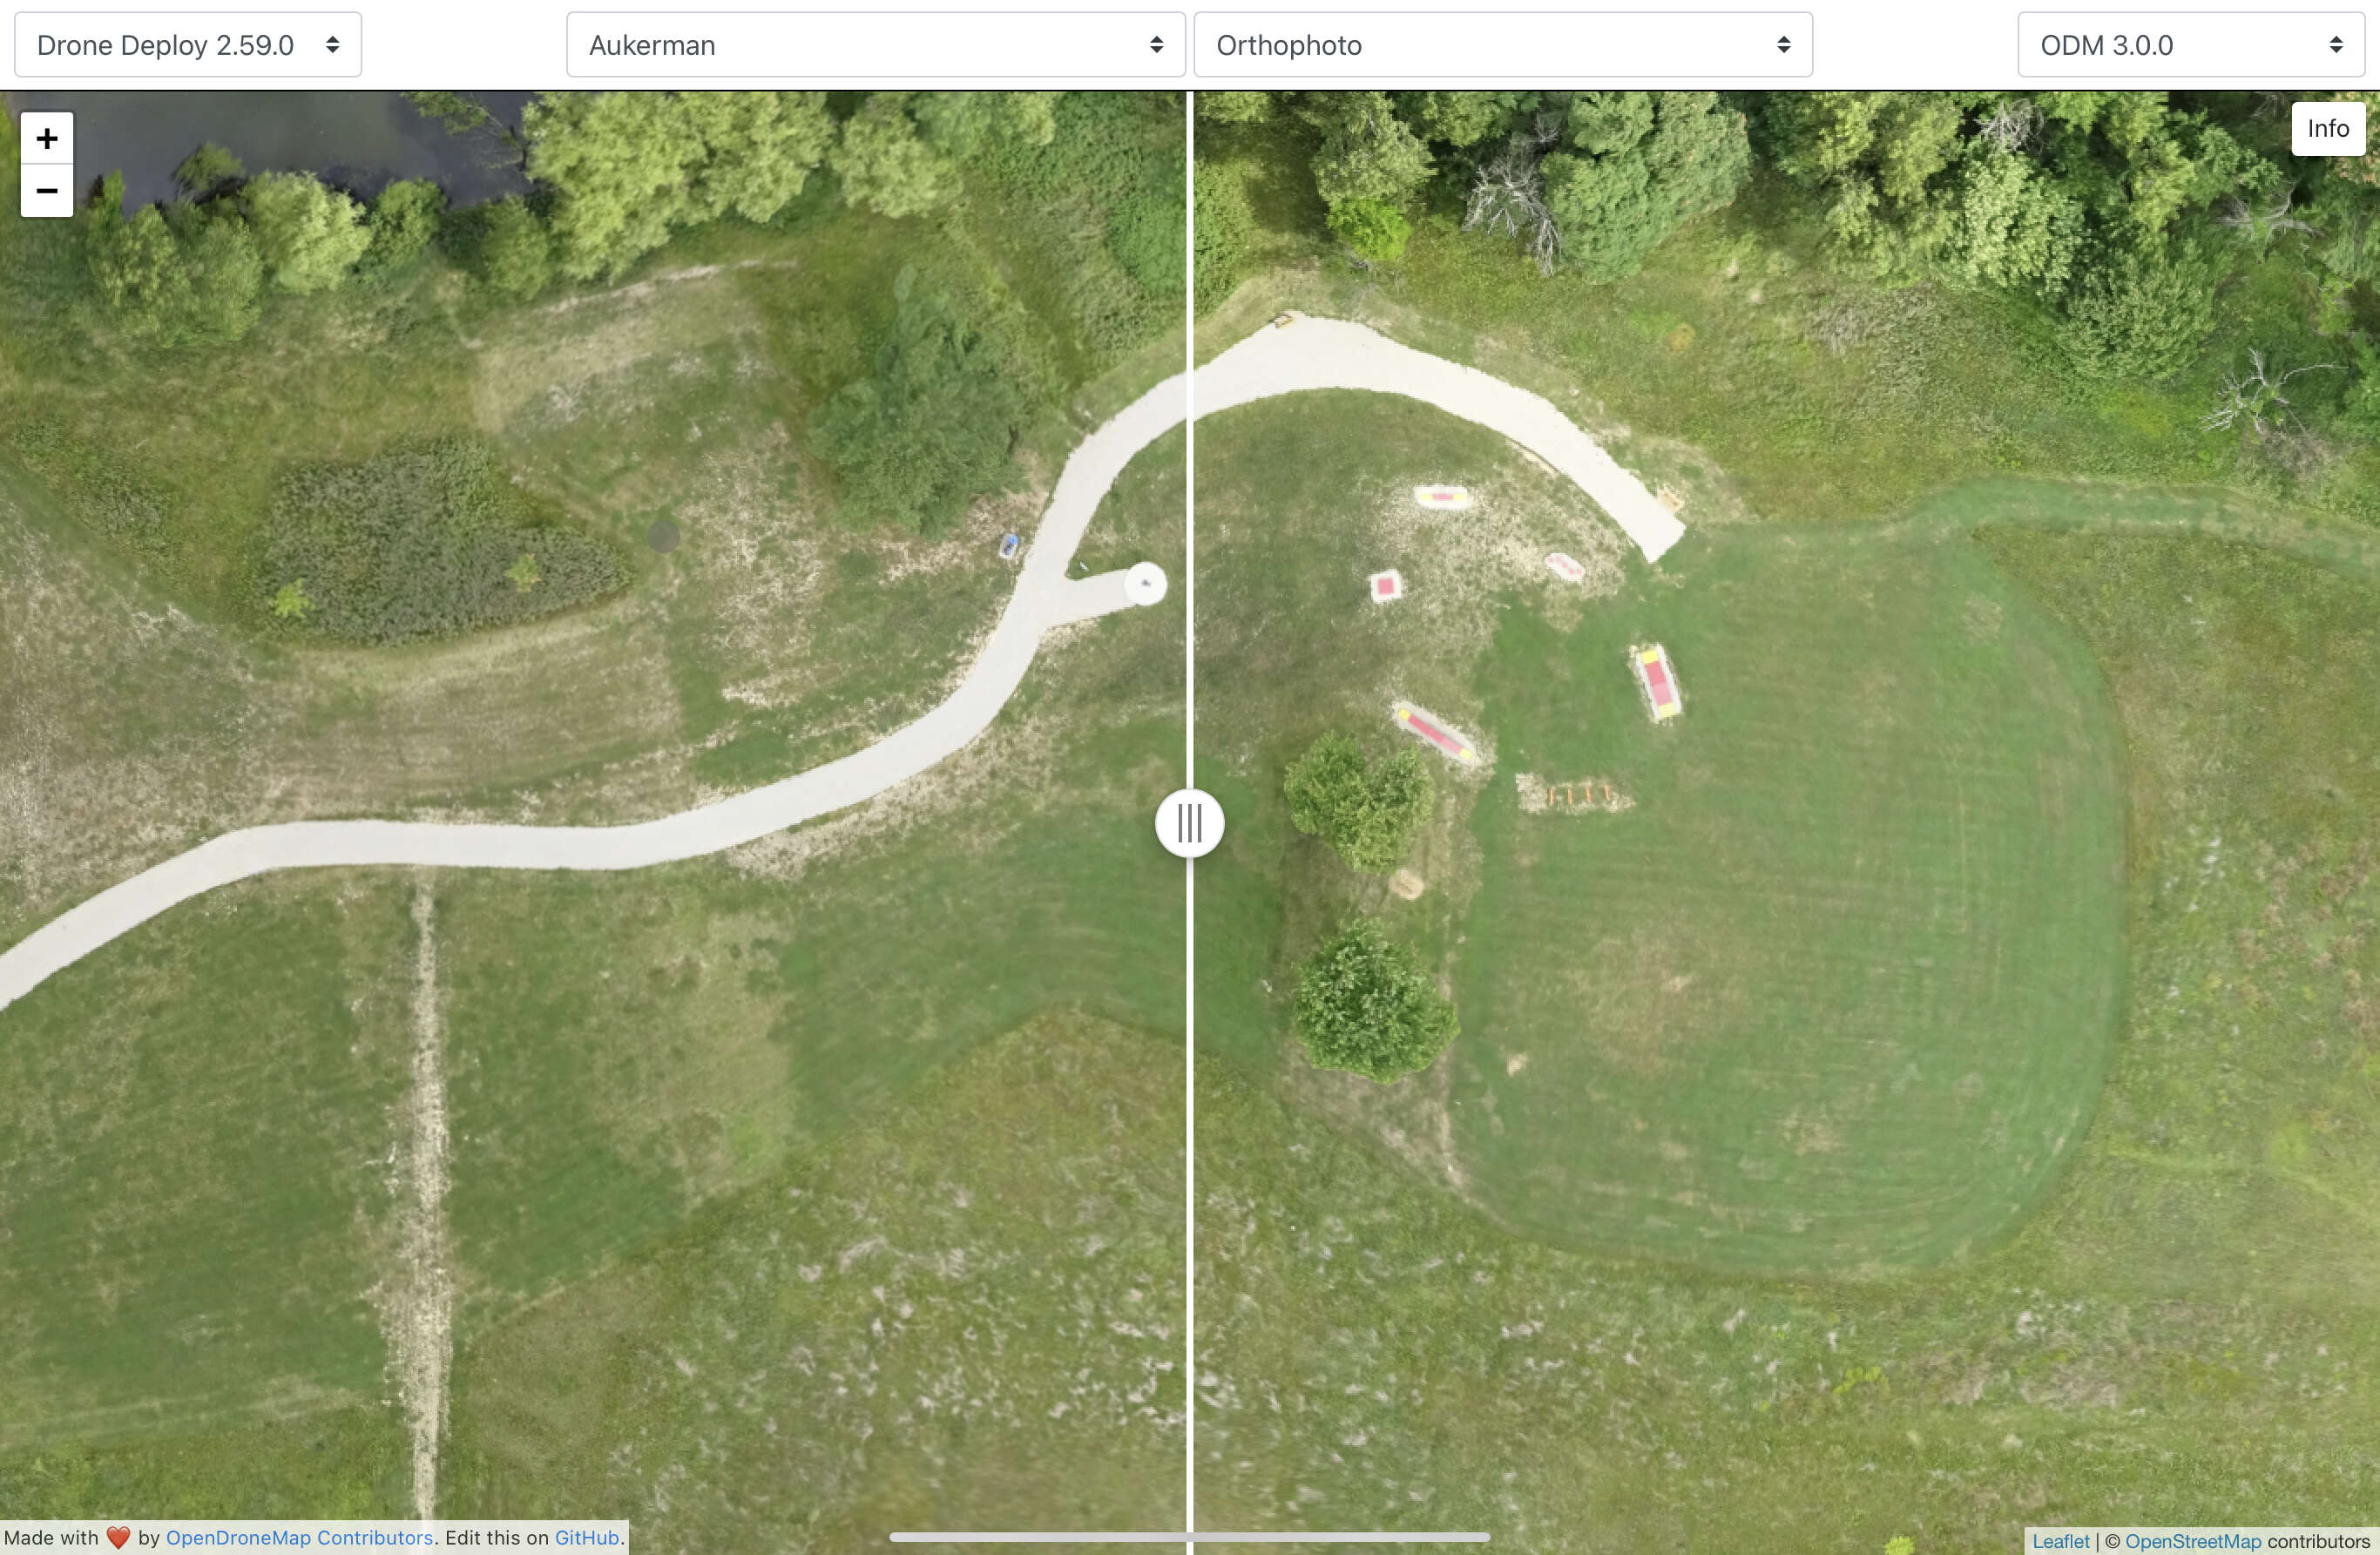
If you wondering how it’s doing compared to the competition they made a side-by-side comparison and claim that it’s similar or even better. Check out this link for the side by side comparison. Here’s for instance a side-by-side comparison of an orthomosaic:
One thing to note is resource usage on your machine. While the minimum requirements are 4GB RAM I ran out of my limit of 8GB trying to process a 48MP 3D model with only 50ish images. So probably as they write at least 16GB is recommended for processing large or highly detailed models. But to me that’s acceptable or a free solution. However, when it comes to actually deploying this in the cloud, then you have to take the cost of the instance into account. For instance Amazon EC2 offers their t4g.xlarge with 4 CPUs and 16GB RAM for a total monthly price of around 96$/month. Still even if you did that it’s still much cheaper than DroneDeploy or similar.
Finally, if you’re wondering about the license the software is licensed under GNU Affero General Public License v3.0, which means you can use it for anything but there’s no warranty and they’re not to be held liable.
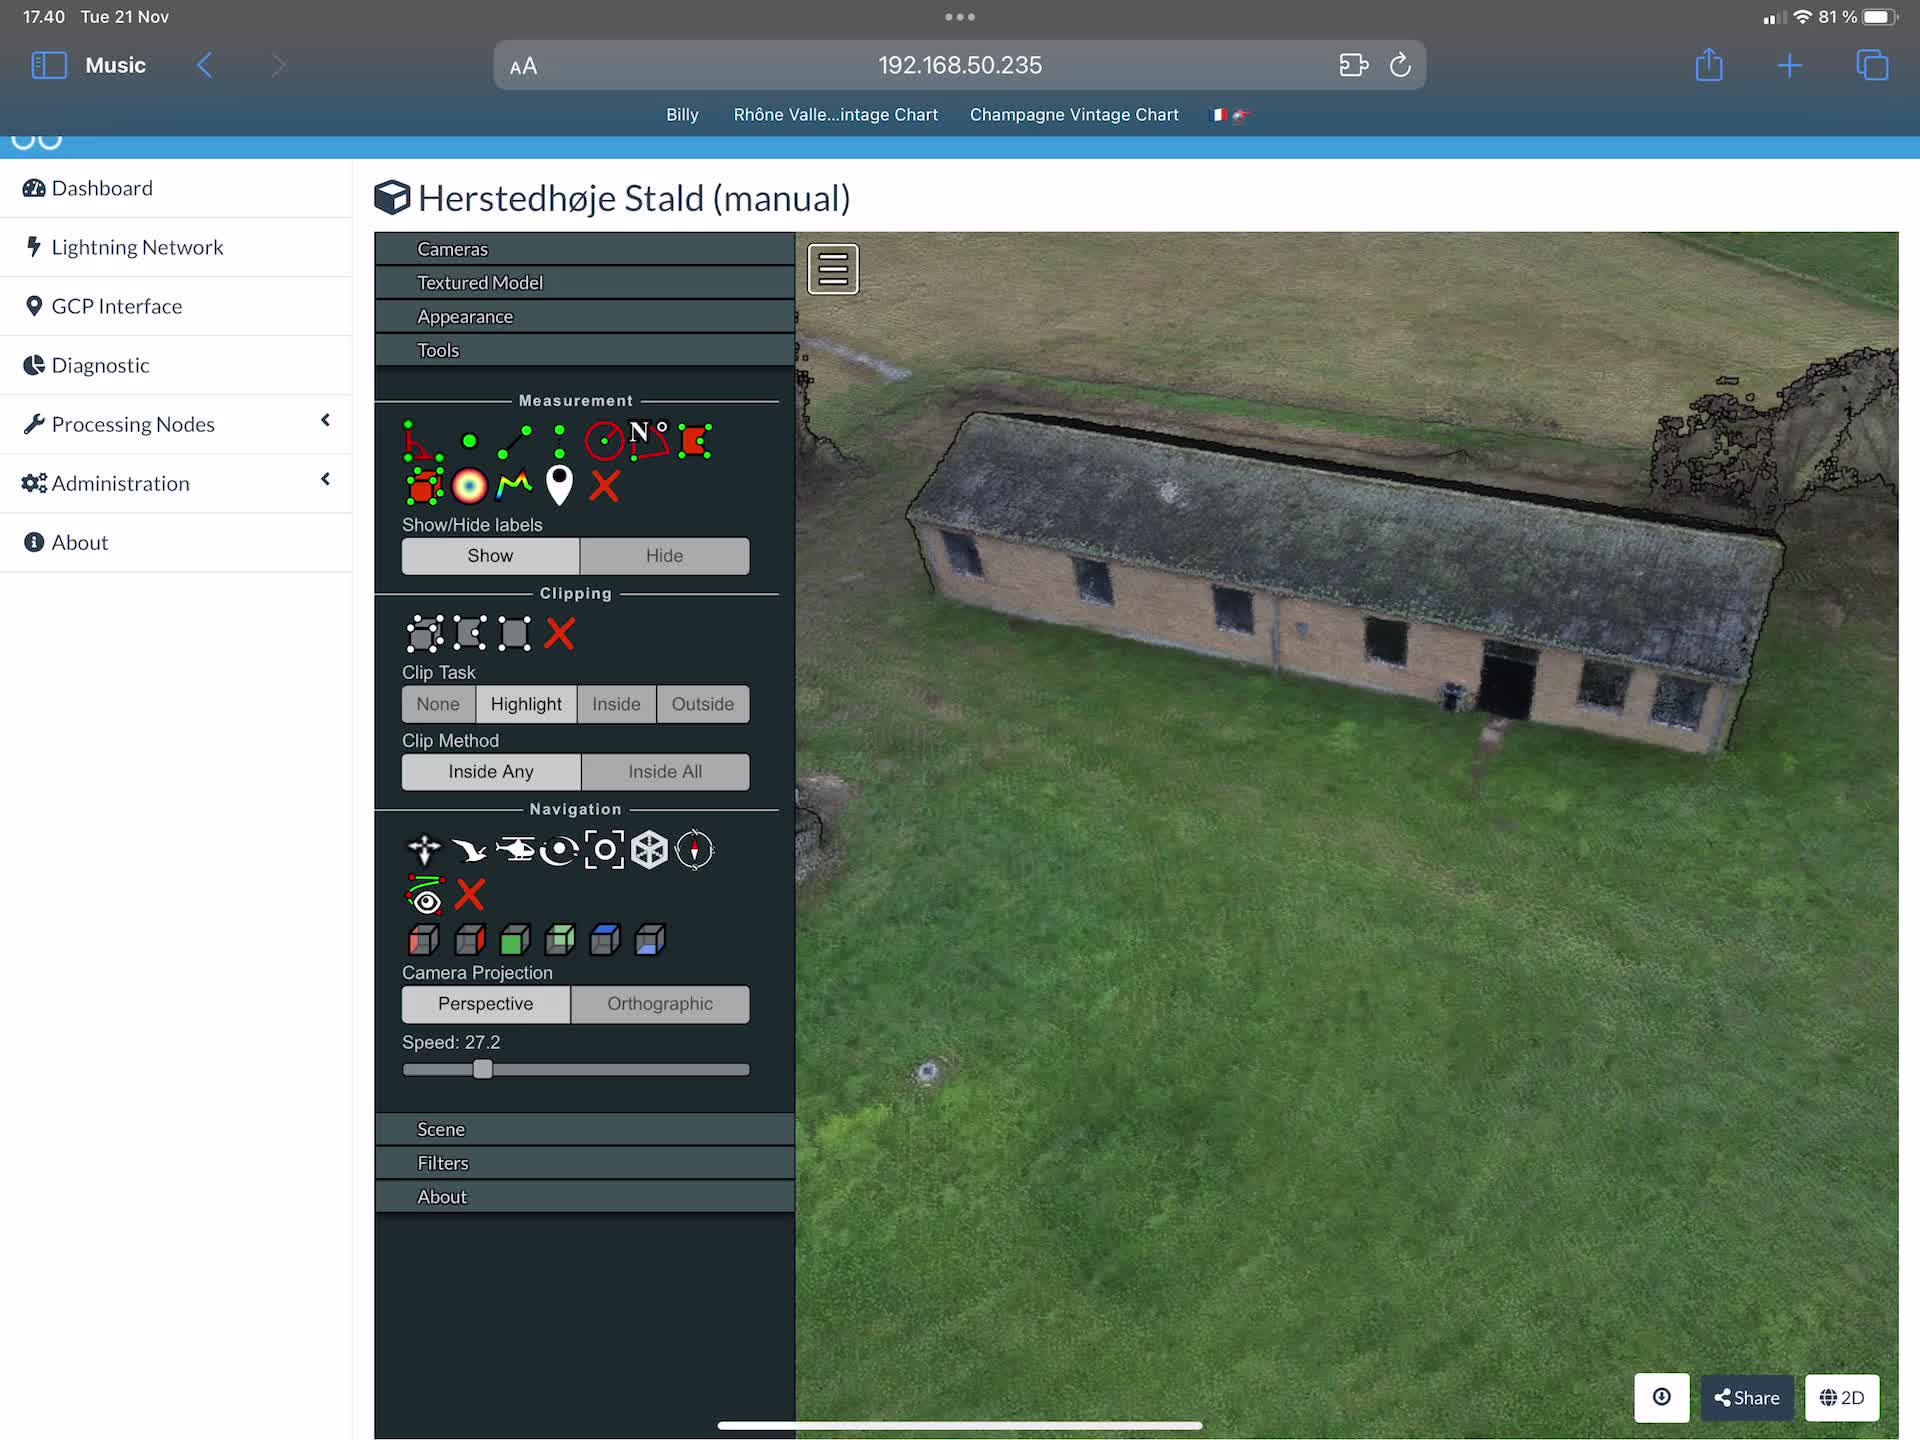
Here’s fun little test model I made of small barn kind of thing in a park close to where I live. Here you also get an idea about the capabilities. Note that the plant health, orthomosaic and digital surface model I show in this was all generated from the images of the drone orbiting the house. You’re not supposed to generate these 3 types of model using an orbit in this way, but even because of that kind of shitty data it still generated something meaningful.
So if you’re up for it I’m going to show you how to install WebODM on a Mac the hard but easy way, i.e not using the paid installer but github. For a newbie who never opened the terminal before the instructions on the WebODM github page might be a bit frightening so I thought I would try to make it very simple and easy to follow here. So this is not written for software people as I assume all of you know homebrew, python, docker etc.
Prerequisites First you need to install homebrew, which will enable you to install some other software you need more easily. Simply open the app “terminal” and then in the little text field type in the command below and hit ENTER.
After a little while that should complete and you now need to use that to install a few things. First in “terminal” type
brew install python
Then after that
python3 -m pip install --upgrade pip
These two commands install the python programming language and software that python uses to install stuff.
Then finally, in terminal again run
brew install docker
and then
brew install docker-compose
These two commands install docker, which is used to run the WebODM.
The software git should be installed already, but just to check run
git --version
if that prints out a version number of git then you’re good to go otherwise run
brew install git
This installs git, which is a program used for downloading the WebODM software.
For MacOS I found it a little weird but apparently to run the Docker daemon which is needed the only way I could get that to work was by installing the Docker Desktop app, so go to the App Store and search for Docker Desktop and install that.
Install WebODM Ok now you’re done with the pre-requisites and you can copy this final command which will install WebODM.
Run WebODM To run WebODM all you need to do is to open terminal if you closed it and type
cd WebODM
./webodm.sh start
After a little while and a lot of output on the screen it will say something like this And if you do as it says all you need to do is to open a browser and type in the address http://localhost:8000.
To stop it simply open the terminal that is running and hit CMD+T to open a new tab then type
./webodm.sh stop
Note this doesn’t mean that your WebODM is live on the internet, it’s just live on your machine, hence the name “localhost”. When you do this you should see a screen saying WebODM at the top and then “first project”. If you ahead and click that you can upload images for your very first project. Just leave everything as it is and you can play with settings later and you’re then on your way to create your first models with WebODM - congrats!!
A few quick notes on memory WebODM is quite hungry for memory, depending on the size of the datasets you use. This is admittedly the primary downside of running your own processing software. So here are 3 tips just to get you over the biggest hurdles. First of all, I had to increase the memory available to WebODM in order to process models with many images. How you do that is by doing what this link is saying https://stackoverflow.com/questions/32834082/how-to-increase-docker-machine-memory-mac/39720010#39720010 - basically just configure Docker to use more memory which is a simple as clicking a couple of buttons. On my 16GB machine I set mine to 14GB and the swap to 4GB. The machine gets sluggish when processing large models but it can do it without any issue.
Secondly, it does use a lot of memory for large datasets. I have 16GB on my 2023 Macbook Pro and it has on a couple of times run out of memory. The only thing you can do then is to either lower the resolution of the dataset, exclude some images or find a machine with more memory.
Finally, an important note, if you’re not using it but just letting it sit idle in the background it’s still holding whatever amount of memory was allocated to it which can cause your Mac to be a bit slow. So I would highly recommend to stop it when you’re not using it AND most importantly, quit Docker, which you simply do by clicking the little whale icon that has appeared with Docker Desktop and hit “Quit”. This will release the memory it had reserved.
Conclusion
So all in all, the only new issue you get with WebODM is memory usage which depending on the datasets you’re processing may or may not be an issue for you. Over the past weeks of using it it hasn’t been stopping me from doing what I was trying to do. And let’s face it for the 4000$ you save you can buy yourself a decent machine to process the data you want.
I hope somebody found this useful. In future posts I’m going to dive into how to deploy WebODM to the cloud and use it for instance to share models with clients.
About Michael Reibel Boesen
Mission: Make the world a better place with technology 🤖.
But I'm also dad 👨👩👦👦, CEO of 🚗Elby, 💌 Weekly Climate, 🥃 distiller (Gefjun), 🎸guitarist, 🎹pianist, 🍷winenerd (WSET3), 🏃♂️runner, 🚁📸photographer, 🎧vinyl record collector and reseller, and 🤓engineer/PhD.